

Water is life, but occasionally, it can pose serious threats to our properties. That’s why efficient water management is not just recommended but necessary, and a crucial part of that is understanding the role of sump pumps. This indispensable apparatus is a staunch line of defense against basement flooding, which can lead to catastrophic water damage. Through this comprehensive guide, we seek to comprehensively illuminate the world of sump pumps – their functionality, importance, and types available in the market. Moreover, it provides a detailed procedure for installing one, walking you step-by-step from initial preparations to the final phase of connecting the system to proper drainage.
Understanding Sump Pumps
Discovering the Magic and Functionality of Sump Pumps: Unraveling How They Work!
Every day, hobbies draw you into new realms of wonder, soaking in knowledge like a sponge. One of these extraordinary fascinations burrowed deep into the heart of home improvement and DIY projects – this is where the intrigue of sump pumps was born.
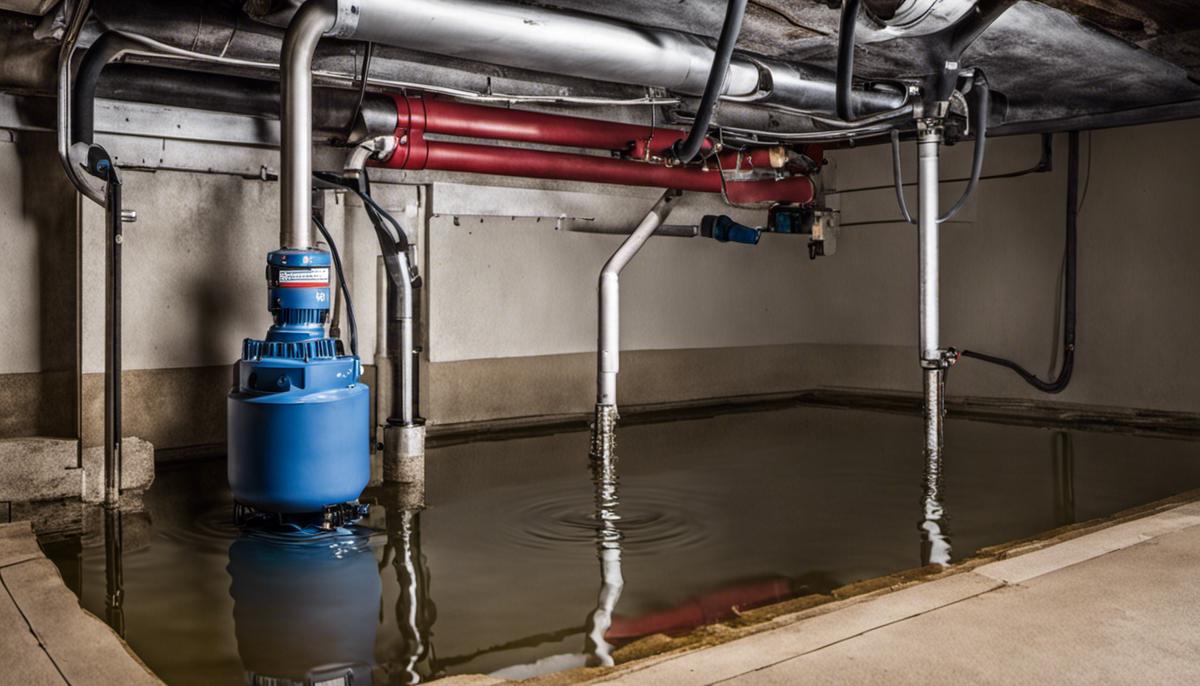
A sump pump, a mark of brilliance in the world of moisture mitigation, is an integral device for homes and business establishments alike. Its paramount function? To evacuate unwanted water from the lower recesses of buildings, namely basements and crawl spaces, preventing water damage and the subsequent harbingers of ruin such as mold and structural instability.
But how, one might ask, does this marvelous contraption accomplish such a task? Simple, it operates in an impressively efficient manner – a study in fluid dynamics and engineering ingenuity!
The sump pump nestles in a small pit or “sump basin,” usually in the most depressed region of your basement or crawl space. This is where water accumulates first due to gravity, was it not for our hero, the sump pump.
When Santa brings you a storm instead of gifts, resulting in water seepage, the water starts accumulating in the sump basin. As the water level rises, it floats a device known not-so-mysteriously as the “float switch.” Bit by bit, as the water level ascends, so does the float switch, until a critical point is reached.
This is where the magic happens. When the float switch elevates to a certain level, the sump pump hums into life, thanks to the activation trigger in the float. Swiftly yet methodically, the pump begins relocating the water via the discharge pipe connected to the pump. The water exits your dwelling, typically depositing itself a safe distance away, where it can’t contribute to more seepage.
Similarly, as this liquid nemesis begins to decrease, the float switch descends, finally turning the pump off when the water reaches an acceptable level. This is a fascinating perpetual cycle that serves your basement well, repelling vile water dust-offs and safeguarding the sanctuary of your home.
But it’s not just heavy rainfalls that evoke the operation of the sump pump. Even mundane factors like melting snow, groundwater swelling, or a particularly thriving laundry day can stimulate its operation. This tireless soldier stands guard round-the-clock, ready to protect your home from water-induced menaces.
The grandeur of the sump pump is in its simplicity. An intricate understanding of fluid dynamics funneled into a device that is an embodiment of protection, stealth, and resilience. The sump pump is indeed a fascinating study for hobbyists and enthusiasts, integrating real-life applications with the captivating world of science. Now, isn’t that worth diving in?

Choosing the right Sump Pump
Getting Down to Business: Selecting Your Ideal Sump Pump
Now that we have dug into the foundational aspects of the sump pump, understanding its working principle, its importance, and how it ingeniously integrates fluid dynamics, it’s time to get practical. How do you choose the best sump pump that will meet your specific needs? Here are some expert tips to guide you through the selection process.
Firstly, determine the type of sump pump that suits your situation. Two common varieties are submersible pumps and pedestal pumps. Submersible pumps, as the name suggests, are installed fully underwater in the sump pit and provide a quiet and longer-lasting solution. On the other hand, pedestal pumps are above water, offering easier access for maintenance, but can be noisier and less durable in comparison.
Always consider the horsepower (HP) of the sump pump. Standard home sump pumps usually range from 1/4 HP to 1 HP. Picking the right horsepower is instrumental in determining the pump’s capability to move water, a factor depending on the area’s flood risk level, the size of the property, and the depth of the basement.
Equally critical is the sump pump’s construction material. Cast iron, stainless steel, and plastic are common choices. Cast iron pumps have remarkable longevity, while stainless steel variants are corrosion-resistant, and plastic pumps offer affordability. Assess your needs and preferences to identify which material would be optimal.
One feature often overlooked when choosing a sump pump is the size of the discharge pipe. Remember, a larger pipe facilitates quicker water removal, reducing the pump’s operation cycles and increasing its lifespan. Additionally, the pipe should incorporate a check valve to prevent backflow of water into the sump pit.
Never underestimate the importance of an auxiliary power source. Power outages often accompany heavy storms – the time when a sump pump is critically needed. Hence, opting for a sump pump that includes a battery back-up system would be an astute decision for ensuring uninterrupted functioning.
Finally, consider the warranty period for the sump pump. A longer warranty often signifies the manufacturer’s confidence in the product’s durability. While the length of the warranty shouldn’t be the sole deciding factor, it certainly deserves consideration.
Choosing a sump pump isn’t about grabbing the first one that meets the eye. It’s about careful evaluation and matching the pump’s features to your need. Remember, a well-chosen sump pump isn’t just a piece of machinery; it’s your home’s shield against potential water damage. Happy shopping!
Sump Pump Installation Process
Now that we have a solid understanding of sump pumps and what they bring to the table, it’s time to take a closer look at the installation process to harness its benefits. There’s no reason to fret, as the installation process, while seeming daunting, can be managed efficiently with careful guidance. We’re here to take this journey together and ensure that your home is safeguarded against potential water damage.
Step 1: Determine the Installation Spot: Picking the right spot to install your sump pump is crucial for optimal functionality. Ideally, it should be at the lowest part of your basement or crawl space, where water naturally flows. Also, the spot should be close to an electrical outlet and drainage pipe.
Step 2: Dig a Sump Pit: Dig a hole that is large enough to accommodate your sump basin but not too large that it wastes space. Try to keep the pit’s width at least 3 inches wider than the diameter of the sump basin and its depth around 6 inches below the basement floor.
Step 3: Install the Basin: Place your sump basin into the dug pit and ensure it is flush with the basement floor. Fill the gap between the pit and basin with gravel until it’s firmly secured.
Step 4: Run the Discharge Pipe: Connect the appropriate discharge pipe to the sump pump, making sure it inclines slightly upwards to promote water flow away from your home. This pipe should lead to a dry well, storm drain, or other legal discharge points.
Step 5: Set Up the Sump Pump: Depending on the model, you may have to assemble the pump before getting it into the basin. This involves attaching the pump to a stand or brick to prevent it from sucking up debris.
Step 6: Install the Check Valve: This valve is klutch; it prevents water from flowing back into your basement once the pump switches off. Attach it to the pump’s discharge pipe using stainless steel clamps to get that perfect, tight seal.
Step 7: Plug In and Test the Pump: Before covering the pit, pour a bucket of water into the basin to check if the sump pump works correctly and switches off appropriately once water is pumped out.
Step 8: Seal the Pit: Once you are sure it’s functioning correctly, seal the sump pit with a secure and vented lid to prevent debris, moisture, and dangerous radon gas from escaping.
While these are the general steps, remember that each sump pump model may come with its specific installation requirements, so always cross-check with the manufacturer’s guide. Take your time, follow the steps meticulously, and soon enough, you will be reaping the benefits of your hard work. Above all, don’t hesitate to reach out to a professional if needed. The safety of your home is priority number one after all. Happy pumping!
Remember, sump pump installation may seem daunting, but it’s an incredibly rewarding process once you’ve crossed the finish line. You’re not simply installing a pump; you’re installing peace of mind, confidence, and protection for your home for years to come. Now, get out there and get your hands dirty!

Thus, we have traversed the expansive terrain of sump pumps, from understanding their function and importance, exploring the different types available, to delving into the intricacies of their installation process. Armed with this knowledge, you are now equipped to make informed decisions when it comes to choosing and installing a sump pump. After all, prevention is always preferable over cleaning up after water damage. So, let’s put this knowledge to practical use and safeguard our properties against the potential threat of water intrusion. Remember, a little investment in a sump pump today can save countless dollars in property damage tomorrow.