

Renovating a bathroom or building one from scratch requires careful planning and specific skills, particularly when it comes to the installation of vital components such as a linear shower drain. The essence of this piece is to provide you with a comprehensive guide on how to install a linear shower drain successfully. We’ll start by breaking down the various parts of a linear drain and clarifying their functions. From there, we’ll explore how to accurately prepare your shower floor and determine the drain’s ideal position. One crucial aspect of this process is the creation of an efficient slope for water drainage; thus, it’s essential to know how to do this correctly. Lastly, we’ll delve into the actual installation of the drain, its sealing procedure, as well as the crucial water flow test. We will also elucidate how to properly tile around the drain and finalize the process.
Understanding the Basics of a Linear Shower Drain
The Mechanism and Components of a Linear Shower Drain, Decoded
Every tech enthusiast relishes the opportunity to understand the deep intricacies behind every piece of technology. That doesn’t stop at the flashiest gadgets and devices, it extends to practical, everyday implementations like the linear shower drain. More efficient and visually pleasing than conventional center point drains, linear shower drains are steadily cementing their place in modern bathrooms.
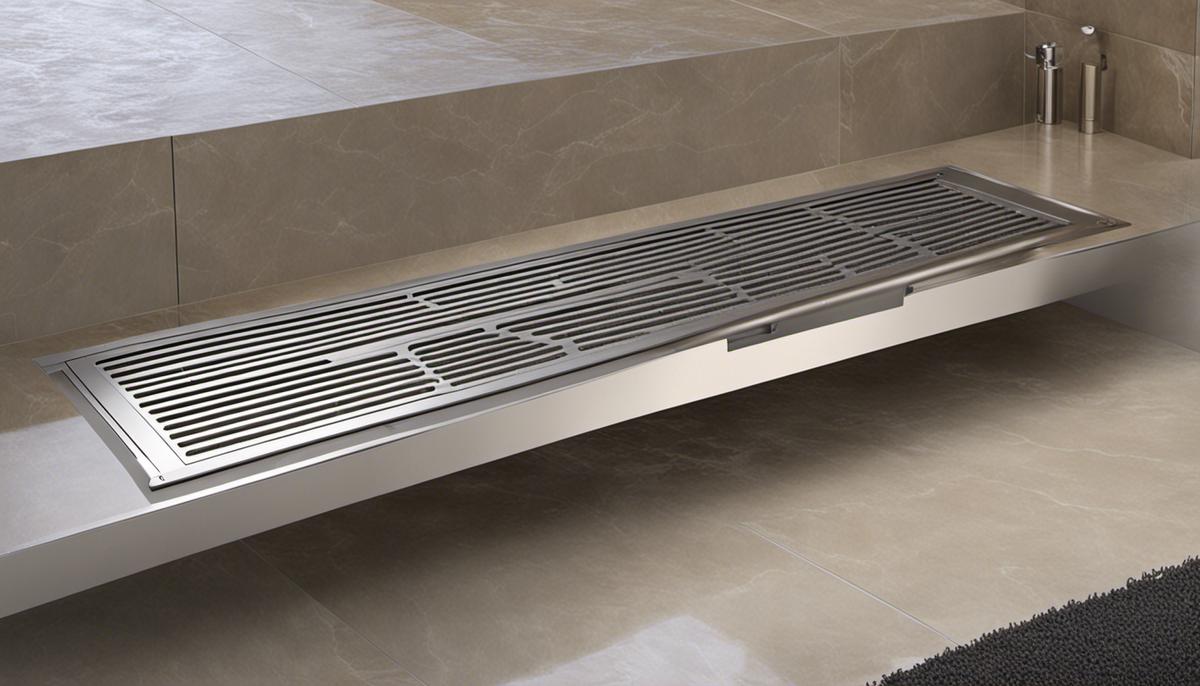
At first glance, a linear shower drain might seem like a simplistic piece of equipment. However, it is comprised of several essential components, each playing its part in smoothly transporting water from your shower area to your sewage system.
Here’s a detailed, direct breakdown of these components and how they come together to form an efficient linear shower drain:
- The Channel Body: The primary component of the linear shower drain, the channel body is essentially its core. Crafted from stainless steel or PVC for long-lasting performance, the channel body forms the main drainage space. It’s tilted gently towards the outlet to facilitate water flow.
- The Outlet Connector: This is where your linear shower drain connects to your home’s wastewater system. The outlet connector ensures a seamless, leak-free connection, effectively preventing any wastewater from spilling out.
- The Drain Grate: Acting as the first point of contact for water, the drain grate allows water to flow into the channel body while preventing larger debris that could cause blockages.
- The Tile Tray: The tile tray or flange is designed to accommodate tiles that match your bathroom floor, providing a sleek and unobtrusive look to the drain.
- The Hair Catcher/Strainer: Just as it sounds, the hair catcher or strainer is tasked with blocking hair or any other small particles from entering the drainage system. This greatly reduces the likelihood of clogs or drain congestion.
In action, when you turn on your shower, the water flows off your body and into the drain. First, it passes through the drain grate where larger debris are intercepted. Then it flows down into the channel body. Owing to the channel body’s slight tilt, the water naturally moves towards the outlet connector. The outlet connector then directs the water into your home’s wastewater system, completing the process without a hitch.
The innovation behind the linear shower drain is part of the drive towards a more efficient, aesthetically pleasing bathroom experience. Next time you step into your shower, take a closer look at your linear shower drain, and appreciate the technological strategy behind its design.
Preparation and Placement of the Drain
Planning and Creating Space for Your Linear Shower Drain: A Step-by-Step Guide
The journey of installing a modern and efficient linear shower drain begins long before the actual installation. Right planning and creating adequate space are keys to a flawless fit and function for your shower. With fair knowledge about its components and functionality, let’s dive into the process of fitting in this piece of technology, which is reshaping bathroom designs and enhanced water flow management.
- Measure, Measure, and Measure Again: The first crucial step towards planning for a linear shower drain is to take precise measurements. Specify the length of the drain and decide on its placement whether against the wall or center of your shower stall. Take care to level out the floor where the drain is to be fitted.
- Consider the Gradient: It’s imperative to ensure a proper slope towards the drain for effective water flow. A good approach is to maintain an incline of 2% from every direction towards the drain. This doesn’t just help the water to flow without obstructions but also ensures the small particles and debris find their way to the drain rather than settling elsewhere.
- Evaluate the Building Codes and Regulations: Every location has specific building codes pertaining to water flow patterns, proper ventilation, and trap distance requirements. Familiarize yourself with them and plan accordingly.
- Don’t Forget About the Ventilation: Proper ventilation is fundamental to avoid any unpleasant odors, but thought should be given to its location. Placed away from the drain, a ventilation pipe ensures seamless operation without interfering with the aesthetics or snagging your toes.
- Mark the Plumbing Roads: Once your plan is in place, mark out the areas where the plumbing pipelines will run, from the source up to the outlet connector. Remember, keeping this pathway clutter-free not only supports efficient water flow but also simplifies future maintenance tasks.
- Double-Check Your Waterproofing: To prevent leakage and water damage, incorporate a waterproofing stage into your plan. Generally, this involves sealing the surrounding area where the drain gets to meet the floor.
- Space for Maintenance Accessibility: Lastly, allow some space for ease of maintenance and possible repairs. Make sure you can easily reach the hair catcher or strainer to clean it periodically.
By following these steps, you can harness the power of advanced technology in the design and function of a linear shower drain and bring not just innovation but also an extra touch of modernity and efficiency to your bathroom.
With its revolutionary design and technology, a linear shower drain not only handles water management effectively but also levels up your restroom’s aesthetics. Adequate space planning and incorporation of these steps ensure you get the best of technology without compromising on practicality. So go ahead and bring this innovative solution home.

Installation and Finishing Process
After gaining a solid understanding of the linear shower drain’s components, design strategy, and water flow mechanism, investing in secure installation and finishing process is the next crucial step. This will not only provide you with a seamless shower experience but also ensure the longevity of your drainage system. Here is a systematic approach to securely install the linear drain and how to efficiently finish up.
Firstly, the mantra of “measure, measure, and measure again” cannot be stressed enough. Meticulously measure the location where the drain will be placed. Measure the length, width, and depth of the space to determine the right size of the drain. One slip in this critical step can lead to a multitude of issues later, ranging from improper fitting to inefficient water flow.
Once the precise measurements are at hand, carefully consider the gradient or the slope. The gradient should be designed towards the drain, which ensures water doesn’t pool or stagnate, but effectively flows right into the drain. This is vital, especially in wet areas where the risk of slip accidents is high.
Next, it’s important to thoroughly evaluate the local building codes and regulations. Different regions may have specific requirements concerning drainage systems. Therefore, reviewing these diligently will save you from potential legal issues, or even forced reconstruction, down the line.
Ventilation also plays an indispensable role in efficient drainage operation. Over time, excess moisture can lead to fungal growth, which can adversely affect both the drain’s functionality and the room’s aesthetics. So, plan ahead for adequate ventilation to keep air circulating and humidity levels at bay.
Additionally, marking the plumbing lines with accuracy is vital. Incorrect plumbing lines can disrupt the optimal functioning of the entire drainage system. So, be sure to identify and mark the water and waste pipes accurately before proceeding with the installation.
Our tech-savvy minds always think of the future, including any possible problems or setbacks that could arise. That’s why it’s essential to ensure your waterproofing is flawless. Any leakages or water seeping into unwelcome areas can cause structural damage over time, so double-check your waterproofing diligently.
Lastly, when choosing the location of the drain, the need for maintenance accessibility must be considered. Avoid choosing locations where it would be challenging to service or clean the drain like under permanent fixtures. Just like software, physical systems, too, require periodic maintenance to keep them running smoothly.
Remember that with both software and hardware installations, taking the time to plan carefully, consider all aspects, and execute with precision ensures that you reap the benefits to the fullest. A well-installed linear shower drain provides an efficient and seamless shower experience, supported by modern design and reliable technology.
An effective installation is not just about completing the current task, but also about considering how the system will perform long-term. Armed with precision, foresight, and knowledge, you are now ready to securely install and finish your linear shower drain, marking another successful project in your technology-driven world.
A well-installed linear shower drain is not only functional but can also add a modern and stylish touch to your bathroom. Having learned about the various components of a linear drain, the preparation process, and precise placement of the drain, you can now add value to your shower compartment and enhance its water drainage capacity. A mastery of the installation process, sealing requirements, water flow testing, and critical detail work like tiling around the drain can equip you with an important skill towards home improvement. By following these steps prudently and considering every detail at each stage, your upgraded bathroom will not only look great but function efficiently for a long time.